Proofreading is a critical final stage of the writing process where you correct small mistakes in grammar, spelling, style, and formatting. Unlike revising, which focuses on the ideas, structure, and flow of your writing, proofreading is all about getting your writing to its final draft state. While it might seem daunting at first, breaking the proofreading stage into manageable steps can make proofreading feel far more approachable and efficient.
In this guide, you’ll learn why proofreading is important, a step-by-step process to make it simpler, and tips to make your proofreading more effective.
Table of contents
Why is proofreading important?
Step 1: Step away from your draft
Step 2: Eliminate distractions
Step 3: Change how your text looks
Step 4: Create a personal proofreading checklist
Step 6: Check spelling and homophones
Step 8: Double-check grammar and sentence structure
Step 9: Verify names, dates, and citations
Step 10: Review capitalization and number formatting
Step 11: Check for layout consistency
How AI is changing the proofreading process
Why is proofreading important?
Proofreading is a vital step in the writing process. It’s your last opportunity to catch issues and refine your work before sharing it with others. Catching mistakes in grammar, spelling, punctuation, and formatting helps maintain your credibility and gives you confidence in your writing.
Here are the primary benefits of proofreading:
- Eliminate distractions: Remove typos, misspellings, and punctuation issues so readers focus on your message.
- Ensure consistency: Check style and formatting like capitalization, hyphenation, and spacing so your writing looks uniform.
- Refine tone and word choice: Adjust language to match your voice and strengthen the impact of each sentence.
- Share with confidence: Present a clean, error-free final draft that highlights your professionalism, enhances your credibility, and ensures readers trust the reliability of your work.
How to proofread in 11 steps
Proofreading can seem daunting. It requires focus, attention to detail, and multiple passes of your writing to be done effectively. That doesn’t mean you need to be an expert to proofread effectively. With a bit of guidance and practice, you can build your proofreading skills.
Use these steps to make your proofreading process more efficient and effective.
Step 1: Step away from your draft
Once you finish revising your draft, take a break. Set your text aside for a while (even a half hour helps, but a day or two is ideal) so you can return with fresh eyes. When you’ve spent days or weeks working on your piece, it can be difficult to spot mistakes because everything feels familiar. Stepping away gives your brain a rest and makes it easier to spot mistakes when you return to start proofreading.
Step 2: Eliminate distractions
Now that you’re ready to start proofreading, set yourself up for success. Turn off the TV, silence your phone, and close any unrelated tabs or programs on your computer. Even small interruptions can break your focus, and concentration is key to effective proofreading. Some people even create or find a distraction-free zone, like a library, for proofreading.
Step 3: Change how your text looks
A great trick to catch errors is to view your writing in a new format or style. Try changing the font, text size, or background color on your screen. Seeing your words differently can reveal mistakes that you overlooked before. Many professional proofreaders prefer proofreading on paper because they catch things on a hard copy that they might miss on a screen. Whatever you choose, remember that the goal is to defamiliarize yourself with the text to force your brain to focus on what it’s reading.
Step 4: Create a personal proofreading checklist
Before you begin the proofreading passes, create a checklist of common errors to look for. A good starting point is to note the mistakes you tend to make frequently (for example, confusing your and you’re or misplacing commas). If you have past feedback from teachers or editors, use it to identify things you should double-check. Writing down a list of your frequent trouble spots ensures you won’t forget to look for them.
Everyone’s list will be different. Yours might include checking for run-on sentences, ensuring you’ve spelled technical terms correctly, or verifying that you used consistent formatting. Keep this personalized checklist handy as you proofread. Not only will it help you catch recurring mistakes now, but over time it will also make you more aware of them so you can avoid those errors in the first place.
Step 5: Read aloud
Now you’re ready for your first proofreading pass. For this one, read your work out loud (or use text-to-speech). Make sure you read slowly so you pay attention to every word and punctuation mark. If something doesn’t sound right, it probably needs your attention. You’ll notice unnatural punctuation (like a missing pause where a comma is needed) and sentences that are too long or confusing. If you stumble while reading or have to reread a sentence, mark it—that’s a clue that something may be off. This pass helps improve the overall clarity and flow of your writing.
Step 6: Check spelling and homophones
Next, do a pass for spelling mistakes. Use a proofreading tool like Grammarly to find and fix mistakes, but do your own review as well. Look out for homophones—words that sound the same but have different meanings and spellings. To catch these, read your text slowly word by word. Taking your time on this spelling pass will help you catch those sneaky typos and misused words.
Step 7: Review punctuation
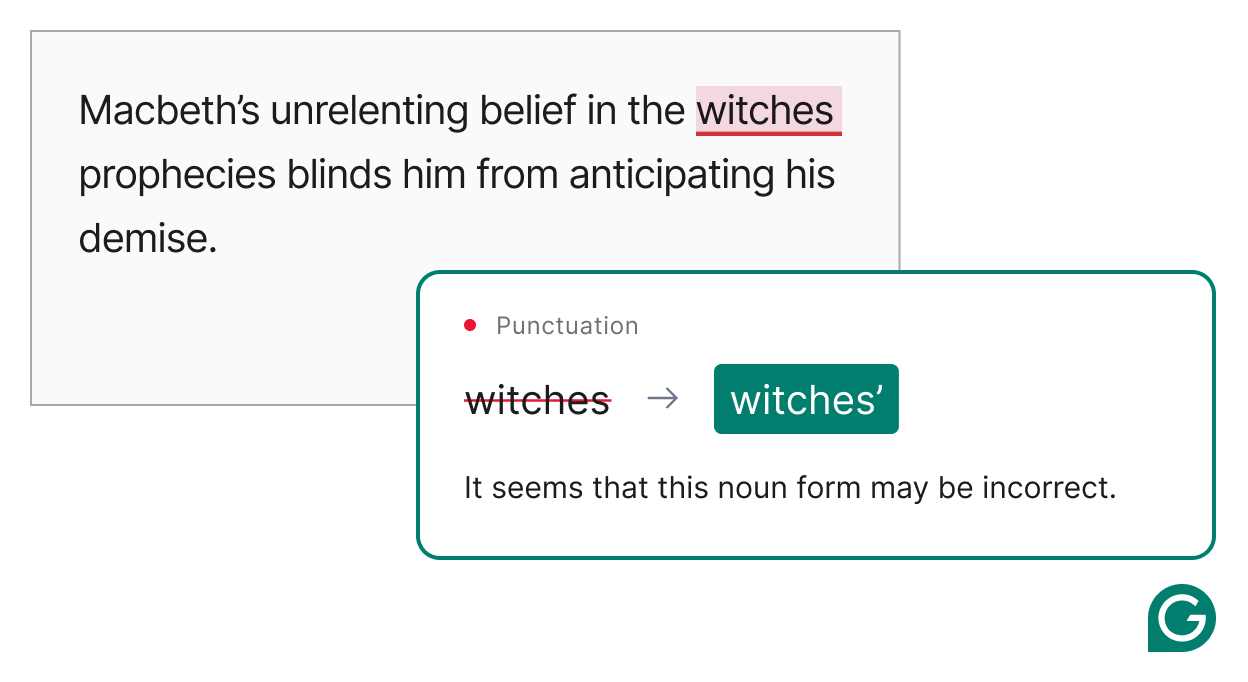
Focus this pass on just the punctuation marks in your writing. Examine every comma, period, quotation mark, colon, or dash you’ve used to make sure it’s the correct mark in the proper place. This way, you’ll catch things like a missing period at the end of a sentence, a question mark where a period should be, or a comma in the wrong place. Common issues to watch for include missing commas, too many commas, misused apostrophes, and inadvertent run-on sentences caused by comma splices. Correcting punctuation ensures your sentences are clear and read as intended.
Step 8: Double-check grammar and sentence structure
Now, do a pass for grammar and overall sentence structure. Here you’re looking for errors like subject-verb agreement (e.g., “Everyone have” should be “Everyone has”), incorrect verb tenses, plural vs. singular noun errors, and any sentence fragments. Grammarly can help by flagging these mistakes for you to review. As you go, also look out for any sentences that seem unclear or overly complicated; it might be a sign that you need to rewrite them for clarity. A careful grammar pass helps you make sure your writing is accurate and readable.
Step 9: Verify names, dates, and citations
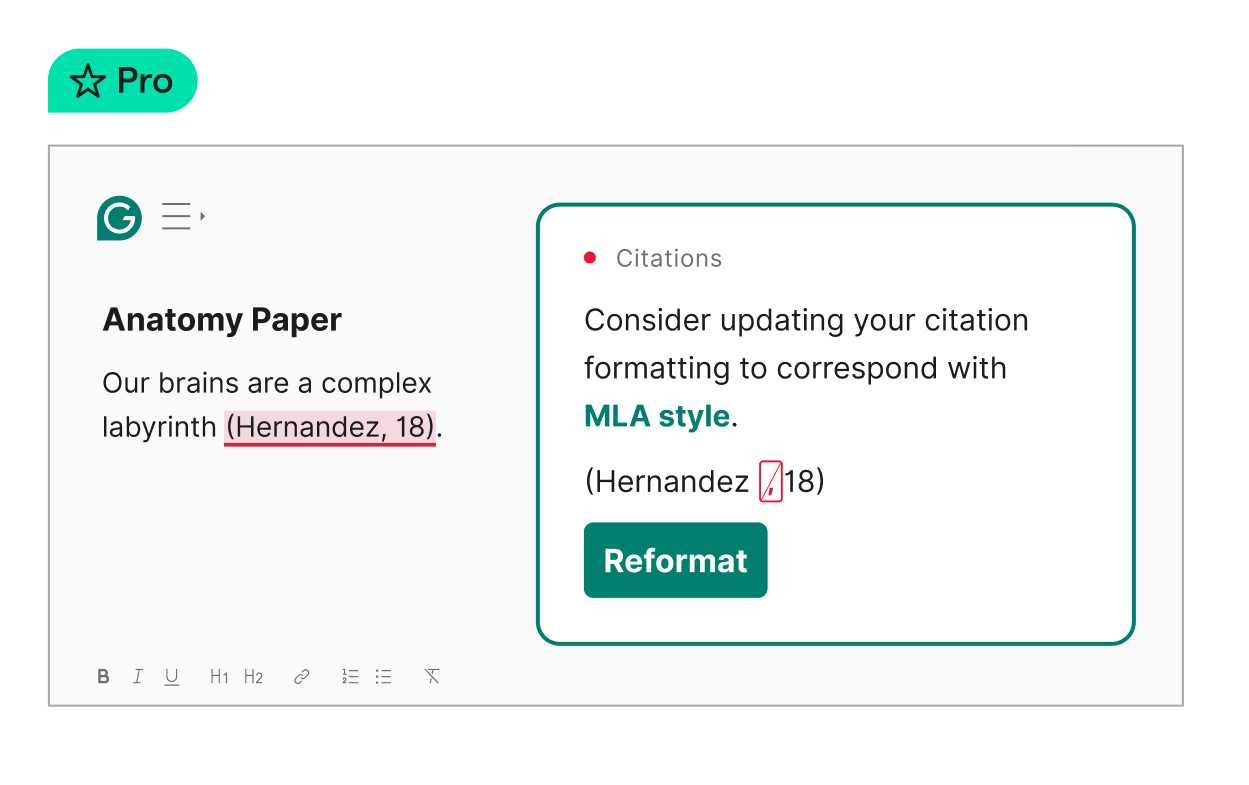
For this pass, focus on the factual details like names, dates, references, and citations. Verify the spelling of every proper noun: people, places, companies, products, etc. Check that any dates you’ve mentioned are correct and properly formatted. If you’ve included statistics or other numbers, make sure that they’re accurate and any rounding or formatting is consistent. For citations, check that any in-text citations correspond to a full entry in your bibliography or works cited page. Verify that you’ve followed the citation format correctly. You can use Grammarly’s citation generator to help. This pass helps you catch things like a reference you listed but never cited (or a citation in the text missing from the bibliography), quotation marks that aren’t properly closed, or a hyperlink that isn’t working.
Step 10: Review capitalization and number formatting
On your next pass, focus on capitalization and the formatting of numbers per your chosen style guide. Ensure that the first word of every sentence is capitalized and that all proper nouns (names of people, places, organizations, etc.) have capital letters where they should. Make sure you’re consistent with your treatment of numbers and capitalization throughout your document.
Step 11: Check for layout consistency
Your final step is about the overall appearance of your piece—how it looks. Make sure your font type and sizes are consistent throughout. Verify that your line spacing and indentation are consistent and your headings and subheadings are styled the same way. Check that any bullets or numbered lists have identical alignment and you’ve treated punctuation the same for each. If you’re working on an academic assignment, confirm that you’re meeting the formatting requirements for the title page, margins, page numbers, etc. Finally, review for layout issues such as a single sentence on a new page.
Proofreading tips
Here are a few tips to help make your proofreading process easier and more effective:
- Read slowly: As you work through your proofreading passes, make it a point to slow yourself down from your normal pace. This will help you spot mistakes more easily.
- Focus on one line at a time: Use a ruler or your finger to cover the lines below the one you’re reading. This tip will prevent you from skipping ahead or getting lost in the flow of your writing.
- Get a peer review: Have someone else read through your piece. Someone with an outside perspective can spot mistakes you might have missed because you’re so close to the work.
- Take breaks: Proofreading can be taxing. You’re more likely to miss things when you’re losing focus, so be sure to give yourself time between passes. That way you can bring your full attention to each proofreading pass.
What to avoid
- Skipping a manual proofread: It can be tempting to rely completely on grammar and proofreading tools for your entire proofreading process. Make sure you supplement them with your own review.
- Ignoring your instincts: If something in your writing feels off—even if you can’t explain why—don’t ignore it. Do some research or ask someone for a second opinion. Your intuition is often the first sign something needs attention.
- Proofreading while revising: It’s hard to catch surface-level mistakes while making big changes to content or structure. Save proofreading for when your draft is stable and close to final.
- Skipping formatting checks: Typos aren’t the only issues to look for. Misaligned headings, inconsistent spacing, or irregular fonts can make your writing look unpolished and distract readers.
How AI is changing the proofreading process
Spell-checkers have been a staple of word processors for decades, quietly catching typos and basic grammar errors in the background. But AI has taken proofreading to the next level. Instead of just flagging misspelled words or missing commas, modern AI tools can now suggest rewrites for clarity, point out inconsistencies in tone, and help you stay aligned with your intent—all in real time.
Still, AI isn’t a set-it-and-forget-it solution. It can miss subtle errors, misunderstand context, or overlook formatting inconsistencies that only a human eye might catch. That’s why the most effective approach to proofreading combines AI efficiency with your judgement and attention to detail. Use AI to flag obvious issues like typos and grammar mistakes or punctuation errors, then follow up with your own careful review.
Grammarly’s AI is built with this partnership in mind. It supports your proofreading process by surfacing potential issues in real time, helping you polish your draft without disrupting your flow. It’s not just a spelling and grammar checker—it’s your proofreading partner, designed to work with you, not in place of you.
Here’s how Grammarly supports your proofreading process:
- Spots grammar and spelling mistakes: Grammarly flags grammar, spelling, and punctuation issues as you write so you can fix mistakes before they slip through. It’s like having a second pair of eyes.
- Improves clarity: Grammarly offers suggestions for clarity, helping you make sure your message lands exactly as you intend.

- Makes sure your citations are formatted correctly: Grammarly detects missing or misformatted citations, checks for plagiarism, and helps you format sources in APA, MLA, or Chicago style so you stay accurate and credible.
Proofreading is the critical finishing touch
Proofreading may feel like a small step, but it’s one of the most powerful steps in the writing process. Whether you’re polishing an essay, a report, an article, or a book, the 11-step process above can make your proofreading stronger and more efficient.
Take your time, read carefully, and don’t be afraid to use tools and techniques that make the process easier. Your future self, and your readers, will thank you.
Proofreading FAQs
Is it hard to proofread?
Proofreading doesn’t have to be hard, but it does require focus and patience. The key is to break it down into manageable steps. Tools like Grammarly can also make the process easier by flagging common errors in real time.
How long should proofreading take?
Proofreading works best when done in multiple passes, each focused on a specific type of error (like grammar, punctuation, or formatting). For a short piece of writing, plan on setting aside at least 30–45 minutes to complete all your passes thoughtfully. Longer or more detailed documents may take an hour or more.
What is the difference between proofreading and editing?
Editing focuses on the big-picture elements of writing: your ideas, structure, argument, and clarity. It often involves rewriting or reorganizing sections to improve flow and impact. Proofreading, on the other hand, deals with surface-level errors like spelling, punctuation, grammar, and formatting. You should always proofread after you’ve finished editing to make sure your writing is polished and mistake-free.
When should I proofread?
Proofreading should be the final step in your writing process. It should come after you’ve made any final revisions to the substance of your piece. The best time to proofread is when you can concentrate fully, so choose a quiet time when you’re not rushed or distracted.