Typically, when people talk about dependency injection (DI), it’s in the context of unit testing. But did you know that you can also use DI to enable cross-component communication? It may be unconventional, but it’s saved us a lot of code smells and boilerplate code in our Grammarly for Mac app. We use Needle and extend the framework by creating an object called a dependency box that listens to lifecycle events on its contained object and emits them to subscribers (similar to how relays work in frameworks like RxSwift). Our solution requires very little modification of existing files and allows us to communicate lifecycle events across component trees using internal or external objects.
In this article, we walk through how we implemented the dependency box and how we use it, in the hopes that other application developers might discover something interesting and useful.
The problem
On desktop, as opposed to mobile, it’s common to have states where multiple windows are on screen at once. Windows may also appear and disappear regularly. Because of this, in our Grammarly for Mac app we have many states where two windows will conditionally rely on each other only if they are instantiated.
During onboarding, green arrows on screen point to different UI elements.
In the example above, the card overlay is a completely separate window on top of the onboarding UI. The overlay can appear and disappear as the user switches windows. Our onboarding UI needs to get information about the overlay so that it can draw the arrow correctly and hide the arrow when the overlay disappears.
When we’re in a state like this, our application’s component tree will look something like the following:
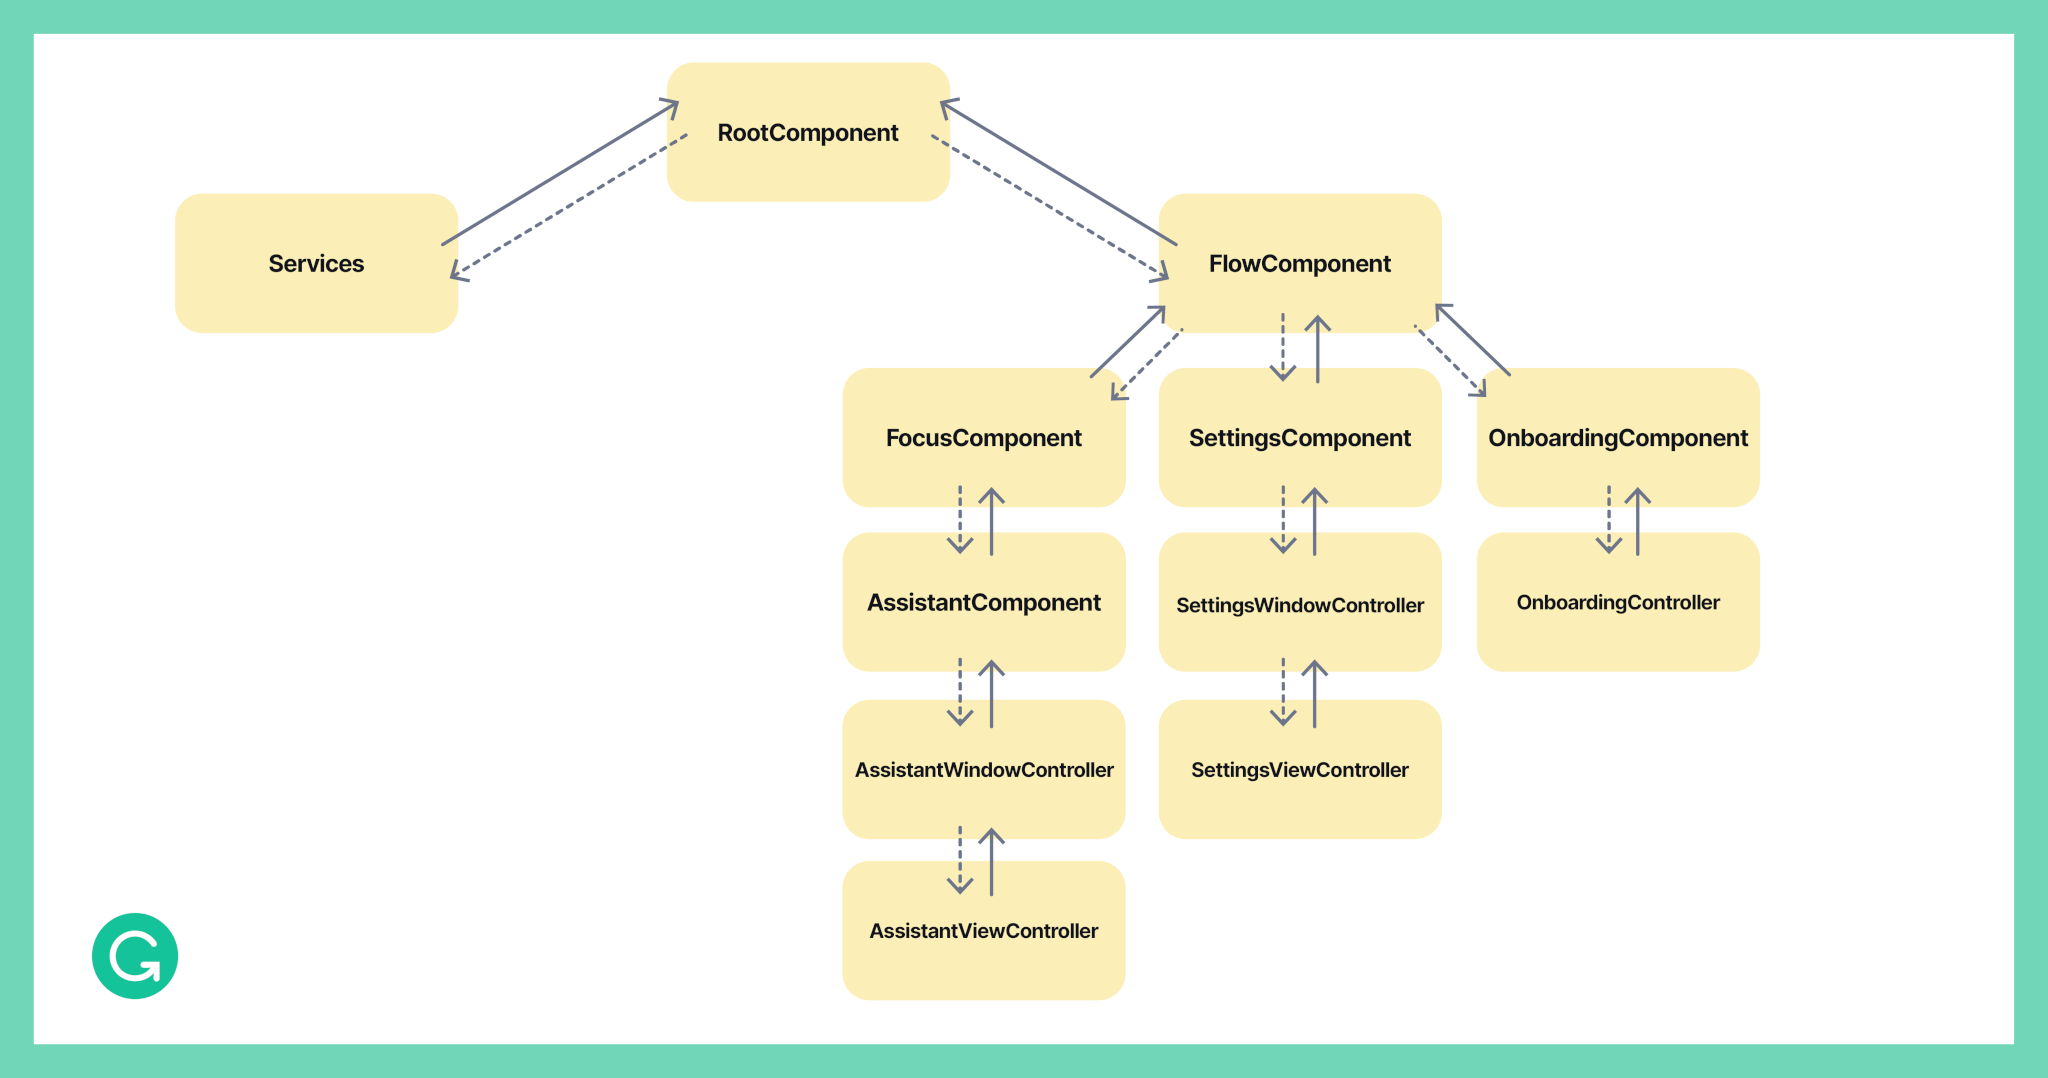
Our OnboardingController handles the onboarding logic, and the AssistantViewController is the assistant overlay. Don’t worry too much about the components in the middle—they’re just there to convey that there are many layers to the component tree.
As you can see, for our onboarding UI to monitor the assistant overlay, we need to pass information between distant cousins on opposite ends of the component tree. When we first encountered this problem, we saw two potential implementations. As a naive solution, we could delegate up to the common ancestor of the onboarding branch of the tree, and a given UI component would then call down to onboarding. Or, we could utilize a framework like RxSwift to create relays to pass down to the relevant components and publish from there. Then we would also subscribe to those relays from onboarding.
However, both of these approaches have some pretty glaring weaknesses in their respective architectures.
Implementing this behavior with delegation
If we were to use delegation for this issue, the solution is conceptually trivial but adds a lot of code in files that shouldn’t care about onboarding. And it is a pretty big violation of the dependency inversion principle. Just to enable onboarding to monitor the assistantView action, we’d need to add something like this to the assistant branch of the tree:
protocol AssistantWindowControllerDelegate: AnyObject {
...
    func assistantWindowControllerDidMakeViewController(_ window: AssistantWindowController, viewController: AssistantViewController)
...
}

class AssistantWindowController: ... {
    ...
    func makeViewController() {
        ...
        delegate?.assistantWindowControllerDidMakeViewController(self, viewController: viewController)
    }
    ...
}
extension AssistantComponent: AssistantWindowControllerDelegate {
    func assistantWindowControllerDidMakeViewController(_ window: AssistantWindowController, viewController: AssistantViewController) {
       delegate?.assistantComponentWindowDidMakeViewController(self, viewController: viewController)
    }
}
We would have to add similar code to the parent component, FocusComponent. When our delegation chain finally reaches the FlowComponent ancestor, we’d then have to call down through the component tree until we arrive at the relevant onboarding object.
extension FlowComponent: FocusComponentDelegate {
    func flowComponentDidMakeAssistantViewController(_ flowComponent: FlowComponent, viewController: AssistantViewController) {
        onboardingComponent?.didMake(assistantViewController: viewController)
    }
}
For brevity’s sake, we’ll leave out the details, but we’d also need a similar function down the chain on each object until we get to the class that wants to subscribe to the AssistantViewController.
Visually, the path of communication would look something like this:

Red arrows indicate where we’ve needed to add code for delegation.
Let’s sum up the trade-offs we’d be making with this approach.
Pros:
- The code path is very easy to follow.
Cons:
- There’s a ton of boilerplate.
- Too many files are now dependent on leaf components. (What if we wanted to replace AssistantViewController with another controller?)
- Observers are not alerted if the object deinitializes.
- This is important, as the onboarding UI needs to know when to erase the arrow when the assistant overlay goes away. We could alert on deinitialization via delegation, but that would double the amount of boilerplate.
Obviously, this approach has many issues. In onboarding, we require input from not one but five completely separate components—you can imagine how messy that would get!
Implementing this behavior with relays
Another approach that we considered was to use a framework like RxSwift (similar to Combine) that’s designed to allow for easy implementation of the pub/sub pattern often used in MVVM architectures. Using this method, we’d create a relay at the least common ancestor component of the OnboardingController and AssistantComponent and pass that relay down to both. Then, we’d have the AssistantComponent publish AssistantViewControllers as they are instantiated, with the OnboardingController subscribing to the published controllers.
The visual representation of this approach is identical to delegation, but less boilerplate is required: You just have to pass down a relay to each component, as opposed to creating an extension at each level. However, there are some major trade-offs here as well.
Pros:
- There’s very little code added.
- Code touches just the key points on the path of communication.
Cons:
- It adds a library dependency.
- It’s hard to follow what the relay ends up being used for if you’re unfamiliar with the codebase.
- Observers aren’t alerted if the object deinitializes.
- Sure, we could add a method to the deinit of objects we want to observe—but then we’d be modifying objects that should not be modified for onboarding, breaking the open-closed principle.
It seemed to us that using relays was definitely better than the delegation approach, but it still had some pretty significant downsides. Is there a better way? We think so—and it involves using dependency injection. To explain, we’ll first need to give you a brief overview of how our app is architected with Needle.
Needle
To understand how we ultimately solved our problem, it’s important to know the basics of Needle first. Needle is a framework for DI that we use to build our Grammarly for Mac application. It abstracts away a lot of boilerplate, and it’s compile-time safe due to its code generation tool (if it builds, it works). Needle relies on a few key concepts: the Component class, the Dependency protocol, and the dependency tree.
The Component class in Needle is used for retrieving and initializing objects or “dependencies” and passing them to descendent components down the tree behind the scenes.
class MyComponent: Component<MyDependency> {
           var myViewController: MyViewController {
                weak {
                    return MyViewController(component: self)
                }
           }
      }
The “weak” function here is an extension our team has made to Needle to allow us to pass components to referenced objects without a retain cycle occurring. We won’t get into the details here—all you’ll need to know is that it acts like a weak, shared reference.
In Needle, Dependency is a protocol that defines which other dependencies a component needs to fetch from its ancestor components further up the tree.
protocol MyDependency: Dependency {
          var myExampleService: MyExampleService { get }
      }
The final piece is connecting Component subclasses together as a dependency tree so that the system knows about all the parent-child relationships. Needle provides a nice way to do this declaratively in code. For more information, see this tutorial.
The dependency box
With some background on how we architect our app with Needle, let’s return to our problem of the onboarding UI needing to know about the assistant UI that’s instantiated in a completely separate window. Needle might be helpful—but it doesn’t solve this problem exactly. Needle allows us to access dependencies that are associated with ancestors of the tree. But we need to communicate safely and cleanly across branches of the tree.
To solve this, we created a special type of object called a DependencyBox that acts as a container for dependencies. It functions similarly to how we would use a BehaviorRelay in RxSwift, but the key difference is that the publisher doesn’t have to publish when the subject gets deinitialized.
public class DependencyBox<T: AnyObject>
The box will publish the lifecycle events of its contained objects to any subscribers, allowing cousins in the tree to listen to each other’s events. The DependencyBox lets us avoid the anti-pattern of delegating up and then calling down. In other words, we can prevent unnecessary code from being added in intermediate components unrelated to their core function.
Here’s the code snippet for putting an object inside the box:
public weak var object: T? {
        didSet {
            guard object !== oldValue else { return }
            if let oldVal = oldValue {
                unregisterDeinitObserver(for: oldVal)
            }
            if let object = object {
                registerDeinitObserver(for: object)
            }
            listenerTokens.allObjects.forEach { $0.onChange(object) }
        }
    }
As you can see above, when an object in the box changes, we notify all subscribers. We also use a >DeinitializationObserver to tell us when the object is initialized:
 private func onObjectDeinit() {
        listenerTokens.allObjects.forEach { $0.onChange(object) }
    }

    private class DeinitializationObserver {
        let boxes = NSHashTable<DependencyBox<T>>.weakObjects()

        deinit {
            boxes.allObjects.forEach { $0.onObjectDeinit() }
        }
    }
Now, how do we actually use this observer for checking if the object is deinitialized? The object in the box shouldn’t need to know if it is in the box, so we can’t use a protocol for it. The trick is to use some Objective-C runtime hackery to accomplish this.
let observer = DeinitializationObserver()
objc_setAssociatedObject(
     object,
     &AssociatedKeys.DeinitializationObserver,
     observer,
     objc_AssociationPolicy.OBJC_ASSOCIATION_RETAIN_NONATOMIC
)
This code will, at runtime, inject into the object a DeinitializationObserver, which will then only be deallocated when ARC cleans up the object we’re watching. With these pieces in place, we can publish when the object deinitalizes or changes.
All that’s left is to circle back to Needle and add in a new wrapper to the instantiations of properties we want to observe:
public func published<T>(in box: DependencyBox<T>, _ factory: () -> T) -> T where T: AnyObject {
        let object = factory()
        box.object = object
        return object
    }
We can also wrap published objects in weak or shared lifecycles as needed.
Now, let’s take a look at how we practically use the dependency box to solve our problem without relying on delegation or a relay framework like RxSwift.
Implementing our solution with the dependency box
Recall that in new user onboarding, we have a state where the onboarding UI needs to get information about the assistant overlay, but both are in completely separate windows:

We can use DI to make sure that our OnboardingController always gets notifications from the AssistantViewController that’s currently active, and also that it does this in a relatively simple way. First, we create a DependencyBox in the first common ancestor component of the two elements:
class FlowComponent: Component<FlowDependency> {
…
    var assistantViewControllerBox: DependencyBox<AssistantViewController> {
     	    shared {
              DependencyBox<AssistantViewController>()
    	    }
    }
…
}
Then, in the component that needs to be watched, we construct the UnderlineManager and put it in the box:
protocol AssistantDependency: Dependency {
var assistantViewControllerBox:  DependencyBox<AssistantViewController> { get set }
}

class AssistantComponent: Component<AssistantDependency> {
…
   var viewController: AssistantViewController {
        shared {
            published(in: dependency.assistantViewControllerBox) {
                AssistantViewController( ... )
            }
     }
   }
…
}
Finally, we just need to make the OnboardingController a listener of whatever AssistantViewController is active right now by subscribing to the DependencyBox:
assistantViewControllerSubscriptionToken = component.assistantViewControllerBox.subscribe { [weak self] assistantViewController in
            guard let self = self else { return }
            guard let assistantViewController = assistantViewController else {
                self.updateDrawState(...)
            }
            assistantViewController.listeners.add(self)
        }
At the end of all this, our final communication path looks like this:

Our OnboardingController can now receive events from the AssistantViewController. And even though the AssistantViewController changes every time the user switches windows, the OnboardingController will always have the correct AssistantViewController when the user is focused on onboarding.
Most importantly, our code stayed relatively clean, and we didn’t have to worry about creating delegates and passing around relays through all our components. We also didn’t need to modify our AssistantViewController in any way for onboarding. To sum it up, let’s look at the pros and cons of the dependency box approach.
Pros
- It’s easy to follow what’s happening in the code, because it’s obvious what the box is being used for when it’s instantiated—you can just look at the type it contains.
- There’s very little boilerplate.
- Observers are alerted if an object is deinitialized.
- Intermediate objects don’t need to know about the box, allowing us to easily make changes to how we use the box and where it gets passed to.
- There are no extra library dependencies, because we extended Needle.
Cons
- Ancestor components need to know about the types further down the tree.
- However, it’s just one type per box (used to specify the generic). If you add component layers or want to change what’s stored in the box, it’s only a one or two line change.
We hope you’ve been able to learn some new techniques and ways of using DI to write cleaner and more declarative application code. Full code for the dependency box is here. If you find these approaches interesting, Grammarly is hiring engineers across our platform to work on challenging problems that impact tens of millions of people. Check out our open roles here.